Coconut cream bars with samoa cookie crust recipe
Are you looking for a delicious dessert recipe that will impress your friends and family? Look no further than these coconut cream bars with samoa cookie crust!
Coconut is a versatile ingredient that can be used in a variety of dishes, from savory to sweet. And when paired with a crispy cookie crust, it creates a dessert that is sure to please. These bars are perfect for a special occasion or just a sweet treat after dinner.
This recipe combines the flavors of coconut and chocolate with the crunch of a samoa cookie crust. It’s easy to make and will have everyone asking for the recipe. So, let’s get started and learn how to make these delicious coconut cream bars with samoa cookie crust!
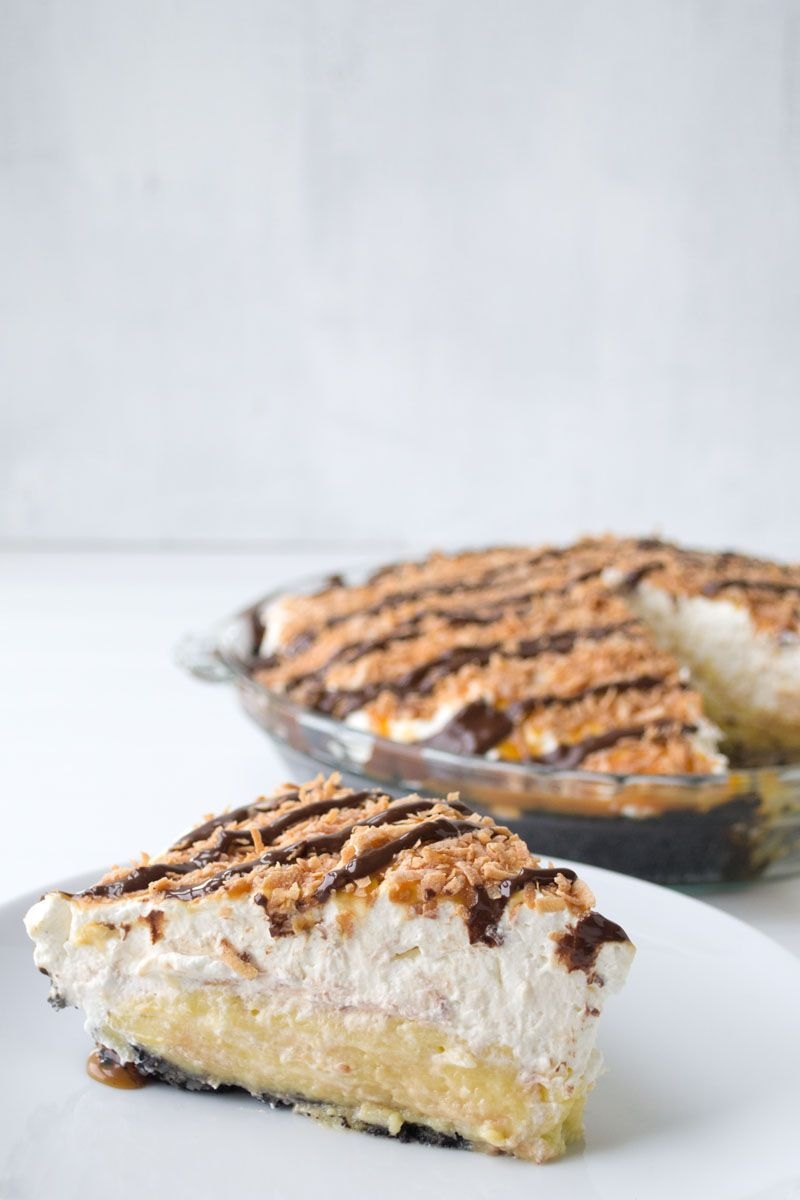
Coconut Cream Bars with Samoa Cookie Crust
There’s no denying that cookie season is an exciting time of year for many. From Thin Mints to Caramel deLites, Girl Scout cookies are a beloved treat that many of us look forward to enjoying. If you’re a fan of these classic cookies, you’ll love this recipe for coconut cream bars with Samoa cookie crust.
To get started on this delicious treat, you’ll need some basic ingredients including shredded coconut, heavy cream and unsalted butter. You’ll also need a food processor, a baking sheet, and parchment paper. With these tools and ingredients in hand, you’re ready to whip up a batch of these dreamy coconut cream bars.
To begin, preheat your oven to 350 degrees and line a baking sheet with parchment paper. Mix together one cup of cookie crumbs from Caramel deLites or other Samoa-type cookies and four tablespoons of melted butter. Spread the mixture into the prepared baking dish and bake for 15-20 minutes or until the crust is golden brown. Once done, let the cookie bars cool completely on a wire rack.
While the cookie crust is baking, make the coconut cream filling. In a medium bowl, combine one cup of shredded coconut, one cup of heavy cream, and half a cup of brown sugar. Cook over medium heat until the mixture comes to a boil. Once boiling, reduce the heat and let the mixture simmer for 5-10 more minutes.
Remove from heat and stir in one teaspoon of vanilla extract and a pinch of salt. Once combined, pour the coconut cream mixture on top of the cooled cookie crust. Spread it into an even layer and let it set in the fridge for at least 30 minutes.
Meanwhile, prepare the caramel coconut layer. In a microwave-safe bowl, melt one cup of caramel sauce and stir in one cup of toasted coconut flakes. Pour this mixture over the coconut cream layer and let it set in the fridge for another 30 minutes.
Instructions
Now that you have all of your ingredients prepped and ready to go, it’s time to start making these decadent coconut cream bars with samoa cookie crust. The first step is to preheat your oven to 350 degrees and line a baking sheet with parchment paper.
Next, you’ll need to make your cookie crust. Mix together one cup of cookie crumbs from Caramel deLites or other Samoa-type cookies and four tablespoons of melted butter. Spread the mixture into the prepared baking dish and bake for 15-20 minutes or until the crust is golden brown. Once done, let the cookie bars cool completely on a wire rack.
While the cookie crust is baking, it’s time to prepare the coconut cream filling. In a medium bowl, combine one cup of shredded coconut, one cup of heavy cream, and half a cup of brown sugar. Cook over medium heat until the mixture comes to a boil. Once boiling, reduce the heat and let the mixture simmer for 5-10 more minutes. Be sure to stir occasionally so that the mixture doesn’t burn.
After the coconut cream has simmered and thickened, remove it from heat and stir in one teaspoon of vanilla extract and a pinch of salt. Once combined, pour the coconut cream mixture on top of the cooled cookie crust. Spread it into an even layer using a spatula or the back of a spoon. Then, let it set in the fridge for at least 30 minutes.
Once the coconut cream has set, it’s time to prepare the caramel coconut layer. In a microwave-safe bowl, melt one cup of caramel sauce and stir in one cup of toasted coconut flakes. Pour this mixture over the coconut cream layer and spread it into an even layer. Then, let it set in the fridge for another 30 minutes.
Finally, it’s time for the last step: adding the chocolate layer. In a small microwave-safe bowl, melt half a cup of semi-sweet or dark chocolate chips. Drizzle this melted chocolate over the caramel coconut layer using a spoon. Alternatively, you can also dip the bottoms of the bars in melted chocolate. Let the chocolate layer set in the fridge for 10-15 minutes.
Can Samoa bars be frozen?
If you find yourself with leftover Samoa bars, or if you’re simply looking to make a big batch ahead of time, you may be wondering if these delicious treats can be frozen. The answer is yes! Samoa bars can definitely be frozen, making them a great make-ahead dessert option.
Before freezing your Samoa bars, it’s important to ensure that they are stored properly. First, let the bars cool completely before cutting them into desired sizes. Next, wrap each bar tightly in plastic wrap, making sure to cover every inch of the bar so that it is protected from freezer burn. You can also use aluminum foil or parchment paper if you prefer.
Once your Samoa bars are wrapped, stack them neatly in an airtight container or freezer bag. Be sure to label your container or bag with the date that you froze the bars so that you can keep track of the shelf life.
When you’re ready to enjoy your frozen Samoa bars, simply remove them from the freezer and let them thaw at room temperature for 15-30 minutes. Alternatively, you can thaw them in the fridge overnight if you’re planning ahead. Once thawed, these bars should still be just as delicious as they were fresh out of the oven.
What is the best way to cut these bars?
Cutting your coconut cream bars with Samoa cookie crust can be tricky, especially if you want them to look as great as they taste. Here are some tips to ensure that you get the best results:
1. Let your bars cool completely: Before cutting your bars, let them cool completely to room temperature. This will make them easier to handle and less likely to fall apart.
2. Use a sharp knife: A sharp knife is key to achieving clean-cut bars. A dull knife can result in jagged edges and uneven cuts. Make sure your knife is sharp before you start cutting.
3. Clean your knife between cuts: Coconut cream bars can be sticky, and caramel sauce can get stuck to your knife. Clean your knife between each cut to ensure that you get clean, even slices.
4. Cut with gentle pressure: Use gentle pressure when cutting your bars. Pressing too hard can cause the layers to squish together, resulting in unappetizing bars.
5. Use a ruler: If you want perfectly even bars, use a ruler to measure and mark where you want to cut. This will ensure that all of your bars are the same size.
6. Chill your bars before cutting: If you’re having trouble cutting your bars cleanly, try chilling them in the fridge for 30 minutes before cutting. This will firm up the layers and make them easier to cut cleanly.
Why didn’t my chocolate melt correctly?
Chocolate is a beloved and versatile ingredient in the world of desserts. Whether you’re baking a cake, making truffles, or simply melting it down for a drizzle or dip, using melted chocolate can take your sweet creations to the next level. However, sometimes even the most experienced bakers and cooks struggle with melting chocolate correctly. If your chocolate didn’t melt, there could be several reasons why.
The first possible culprit is water. Chocolate and water simply don’t mix. If even a drop of water gets into your chocolate while melting it, it can cause the chocolate to seize, which means it will become a grainy, clumpy mess. Make sure all your utensils and bowls are completely dry before you start melting your chocolate. Avoid using wooden spoons or bowls too, as they can gather moisture and affect the chocolate’s consistency.
Another reason why your chocolate may not be melting is that you’re overheating it. Chocolate needs to be melted slowly and gently over low or medium heat in a double boiler or microwave-safe bowl. Heating it too quickly or at too high a temperature can cause the chocolate to burn or scorch, which can give it a bitter taste.
Additionally, using the wrong type of chocolate can also affect how it melts. There are different types of chocolate available in the market, including dark chocolate, milk chocolate, and white chocolate. While all of them can be melted, they have different melting points and require different methods. For example, white chocolate melts at a lower temperature than dark chocolate, and milk chocolate is somewhere in between. Make sure you’re using the right type of chocolate and following the melting instructions on the packaging.
Stirring your chocolate regularly and using a spatula to scrape the sides of the bowl can aid in the melting process, but be careful not to overdo it. Overmixing or adding too much pressure while stirring can cause the chocolate to cool too much and harden, making it difficult to work with.
Meet Jaxon Monroe, the culinary enthusiast and food blogger who has taken the online cooking world by storm with his passion for experimenting with flavors. With a sharp eye for detail and an innate ability to create and present dishes in an appealing way, Jaxon’s blog is the go-to for any food lover seeking inspiration.
From BBQ chicken pizza bites to healthy Thai spiced salmon cakes, Jaxon’s recipes draw upon a range of cuisines and flavors, each as tantalizing as the last. But it’s not just about indulgence – Jaxon also shares tips and tricks to help readers improve their cooking skills.
Whether you’re an experienced cook or just starting out, Jaxon’s blog offers valuable insights and creative ideas that will leave you inspired in the kitchen. So why not join the thousands of readers who have already discovered the magic of Jaxon Monroe’s unique take on cooking?